There are many professional MIDI controller out there: keyboards, drum pads, mixer, pedals, etc. One type of controller that interests me most is the ribbon controller because I wanna try to emulate with the software plugins what can be done with instruments such as the Ondes Martenot. I think that this type of controller fits very wellto control virtual instruments such as strings and horns, as it is characterized by aposition and pressure sensitive ribbon, so you can control in a very intuitive way thenotes pitch and velocity . I decided to do a MIDI ribbon controller using Arduino.
UPDATE: New version at this link.
NOTE: I am not an electronics expert so if you decide to implement this project I am not responsible for any damage to computers, instruments, houses, people andanimals that may arise.
For this project I used:
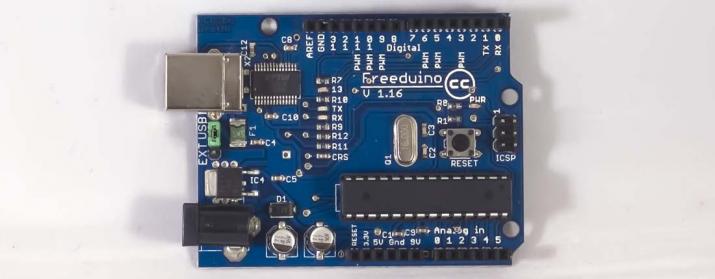
–Arduino
–Spectra Symbol Ribbon sensor – 500mm
–Interlink Ribbon pressure sensor – 600mm
-2 10khom resistors
-1 220 hom resistor
–1 female MIDI DIN-5 connector
–1 stripboard
-wires
–break away female headers
-1 wooden axe
As you can see just a few components are necessary and the whole cost is around 70 bucks.
In this post I describe the first version of my controller that I programmed to operate inconjunction with the vst plugin Kontakt. When you press the finger on the ribbon the position determines the pitch of the note to play, then holding your finger shifting laterally varies the “tuning” of the selected instrument in Kontakt, resulting as a sort ofpitch bending. Upon the pressure applied on the ribbon changes the volume of the instrument.
This is the schematics .
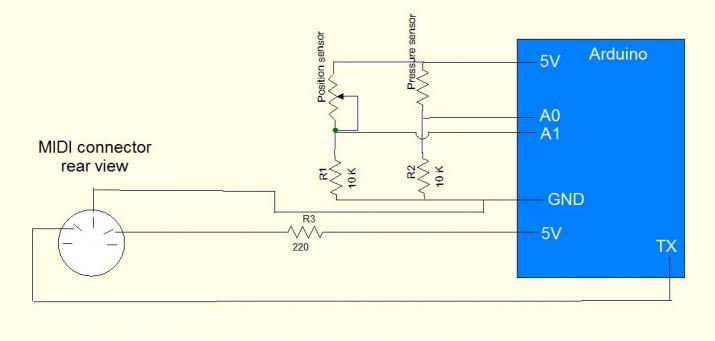
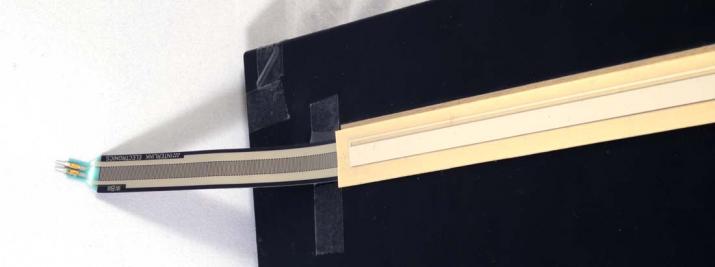
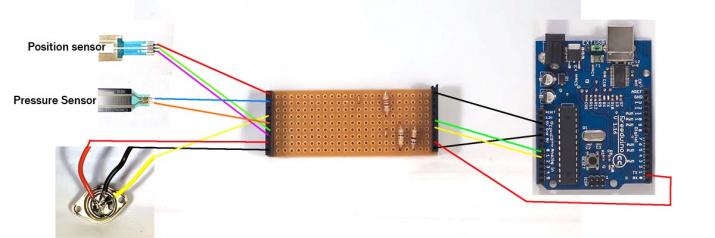
The Spectra Symbol’s sensor has 3 connectors like a potentiometer and works exactlythe same way by changing its resistance (from 10 to 0 Khom) depending on theposition of the finger. The Interlink sensor has only two connectors but it also functions as a variable resistance, from a couple of megahom to 0, depending on the pressure . Both sensors are in the shape of a ribbon (50 cm the Spectra Symbol sensor, 60 for the Interlink one).

First I attached the sensors on a wooden shelf. First the pressure sensor and then theposition sensor.
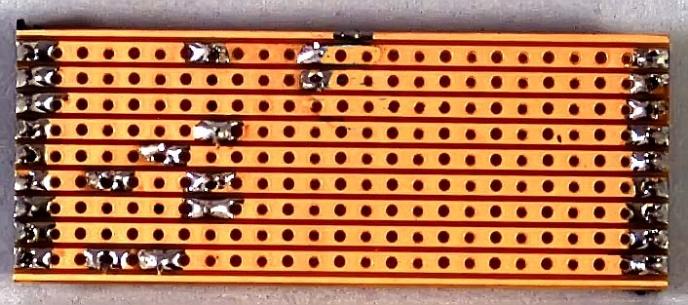
I connected the ribbon to Arduino. I have also connected to Arduino a DIN5 MIDI connector since all data is sent to the computer via MIDI connector and not via USBcable. To facilitate the connection I used a small stripboard configured in this manner.
This is the rear of the board.
This is the Arduino sketch I wrote and is based upon the MIDILIBRARY that must be installed to compile.
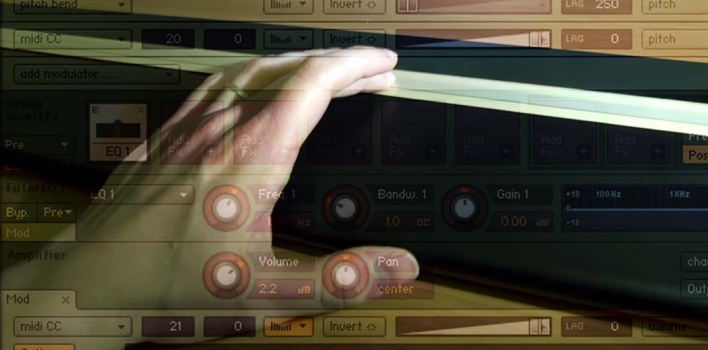
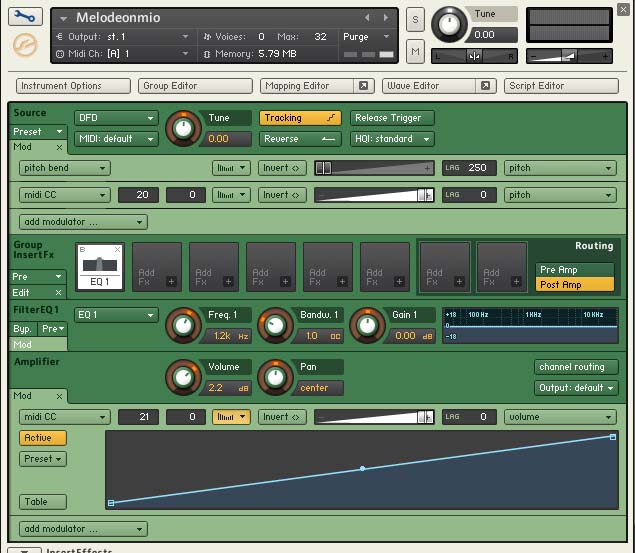
The setup routine runs for the first 5 seconds, and calibrates the minimum and maximum values of the two sensors. So in the first 5 seconds you press your finger right on the ribbon giving a pressure from 0 to the maximum that you want to use. The “loop”routine checks if the position sensor is pressed and eventually is sent the note via midi. If you continue to press, the finger position and pressure data is read, and suchdata is sent as MIDI Control Change 20 and 21. I mapped, in the Kontakt software,these Control Change codes to the “Tuning” and “Volume”of the instrument Melodeonbut of course you can use any parameter of any software that will enable a MIDI mapping, you can also use different control change.
For those who want something more professional I advice on the Eowave Persephone.This instrument, which was used by the great Peter Christopherson in his lastperformances, it is also dual touch and includes a great synthesizer.

How to build a MIDI ribbon controller with Arduino by Giuseppe Di Cillo – Coagula.org is licensed under a Creative Commons Attribuzione – Non commerciale – Condividi allo stesso modo 3.0 Unported License.