Working on my MIDI ribbon controller I needed to implement a menu to easily configure several parameters, but I found information on how to handle a menu, how to manage an LCD display, but very poor info on how to combine the two things. However, thanks to Alexander Brevig Menubackend library I managed to create the menu I wanted.
I downloaded the Alexander Brevig Library version 1.4 and I slightly modified it adding, at line 195 of the MenuBackend.h file , immediately before the line “private:”, this method:
void toRoot() {
setCurrent( &getRoot() );
}
I needed this method to be able to return easily to the root of the menu.
In my sketch I then imported and the Menubackend library and the LiquidCrystal library which is included in the Arduino IDE. The MenuBackend library allows to manage a very flexible menu. You can create the menu structure using such methods as addRight, addLeft, Add and AddBefore to add the entries to the right, left, below or above other menu items. To browse an item other intuitive methods are used such as moveLeft, MoveRight, moveUp and moveDown. In my example I created a structure like this.
Main
|
Item1——————————-Item2—————————————————-Item3
| |
Item1SubItem1—–Item1SubItem2 Item2SubItem1——Item2SubItem2——Item2SubItem3
MenuBackend triggers an event whenever the current menu item changes and so I used to “print”on the LCD display the current menu item. In addition another event is triggered when an item is selected by the method “use”. This could be used to change the status of your application, but in this case I simply print to LCD the phrase “You used” followed by the name of the used menu item.
To navigate the menus I used 4 buttons (Left, Right, Esc and Enter).
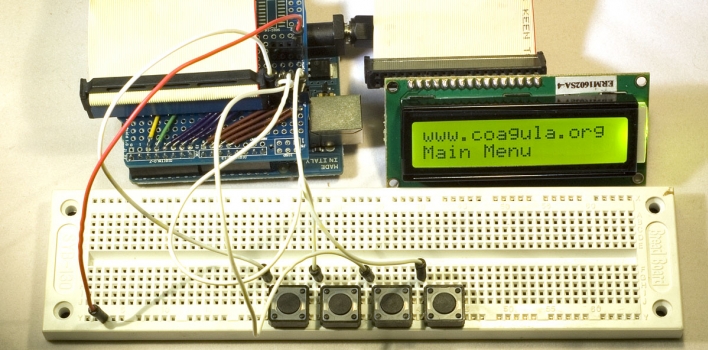
For this project you need the following components:
- Arduino compatible (should well be fine the old Arduino Diecimila)
- an Hitachi HD44780 compatible LCD display
- 4 buttons
- 4 resistors 10k
Optionally, to facilitate connections you can use a card for prototypes (protoshield). I have used one from Nuelectronics.
The schematic is very simple. There are 12 of the 16-pin LCD display connected to the Arduino board: 6 are input pins, 2 power pins, 2are used to power the interior light ,1 to enable writing ( it is connected to ground )and 1 to adjust the contrast ( even is connected to the this ground to have always the maximum contrast). The 4 buttons are connected to four input pins of the Arduino, which also are connected to the ground through 10K resistors. The other end of the buttons is connected to the Arduino 5V.
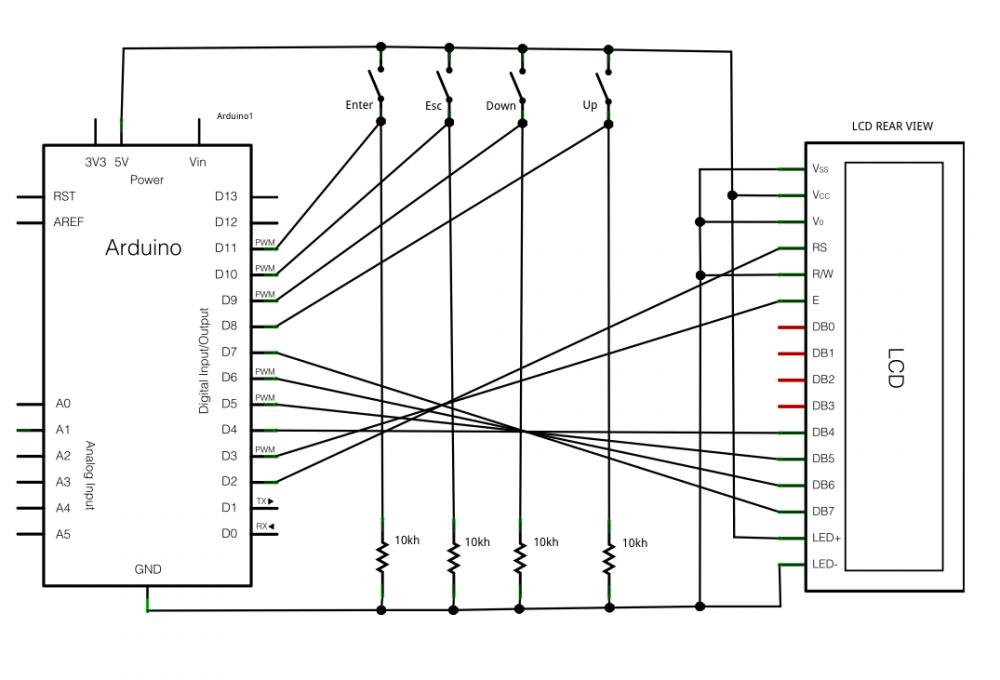
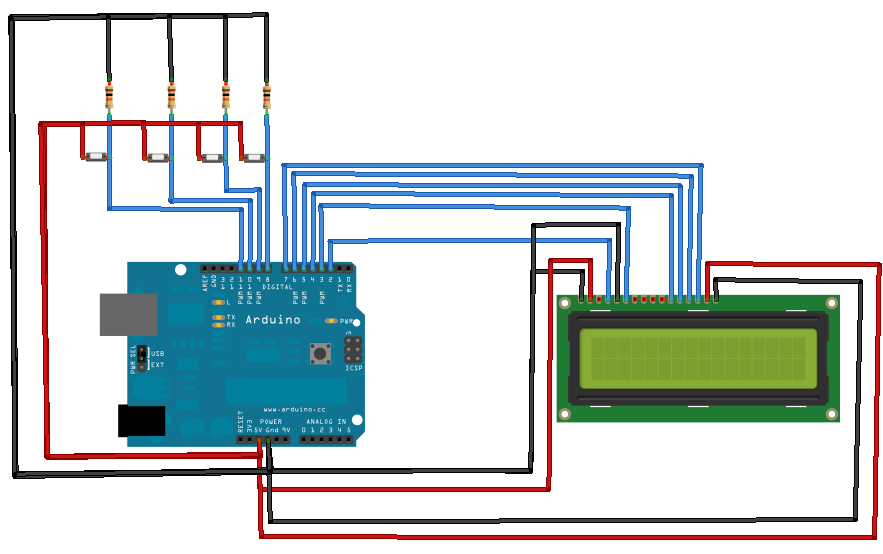
images developed using Fritzing
To connect the LCD display to the Arduino I first soldered two 6-pin strips male on the proto pcb and then, thanks to the an idea given to me by Emanuel in the comments of another post, I used an old parallel cable for IDE hard disks.
Update: As noted by Liudr for safety reasons is better to use a very old 40 wires calble instead of the 80 wires cable used by me in these pictures.

I think this type of structure although very simple may be useful in many situations to manage menu and LCD display with Arduino, and ican be used as a basis for other modifications.
/*
Copyright Giuseppe Di Cillo (www.coagula.org)
Contact: dicillo@coagula.org
This program is free software: you can redistribute it and/or modify
it under the terms of the GNU General Public License as published by
the Free Software Foundation, either version 3 of the License, or
(at your option) any later version.
This program is distributed in the hope that it will be useful,
but WITHOUT ANY WARRANTY; without even the implied warranty of
MERCHANTABILITY or FITNESS FOR A PARTICULAR PURPOSE. See the
GNU General Public License for more details.
You should have received a copy of the GNU General Public License
along with this program. If not, see <http://www.gnu.org/licenses/>.
*/
/*
IMPORTANT: to use the menubackend library by Alexander Brevig download it at http://www.arduino.cc/playground/uploads/Profiles/MenuBackend_1-4.zip and add the next code at line 195
void toRoot() {
setCurrent( &getRoot() );
}
*/
#include <MenuBackend.h> //MenuBackend library – copyright by Alexander Brevig
#include <LiquidCrystal.h> //this library is included in the Arduino IDE
const int buttonPinLeft = 8; // pin for the Up button
const int buttonPinRight = 9; // pin for the Down button
const int buttonPinEsc = 10; // pin for the Esc button
const int buttonPinEnter = 11; // pin for the Enter button
int lastButtonPushed = 0;
int lastButtonEnterState = LOW; // the previous reading from the Enter input pin
int lastButtonEscState = LOW; // the previous reading from the Esc input pin
int lastButtonLeftState = LOW; // the previous reading from the Left input pin
int lastButtonRightState = LOW; // the previous reading from the Right input pin
long lastEnterDebounceTime = 0; // the last time the output pin was toggled
long lastEscDebounceTime = 0; // the last time the output pin was toggled
long lastLeftDebounceTime = 0; // the last time the output pin was toggled
long lastRightDebounceTime = 0; // the last time the output pin was toggled
long debounceDelay = 500; // the debounce time
// LiquidCrystal display with:
// rs on pin 2
// rw on PIN3
// enable on pin 6
// d4, d5, d6, d7 on pins 4, 5, 6, 7
LiquidCrystal lcd(2, 3, 4, 5, 6, 7);
//Menu variables
MenuBackend menu = MenuBackend(menuUsed,menuChanged);
//initialize menuitems
MenuItem menu1Item1 = MenuItem(“Item1”);
MenuItem menuItem1SubItem1 = MenuItem(“Item1SubItem1”);
MenuItem menuItem1SubItem2 = MenuItem(“Item1SubItem2”);
MenuItem menu1Item2 = MenuItem(“Item2”);
MenuItem menuItem2SubItem1 = MenuItem(“Item2SubItem1”);
MenuItem menuItem2SubItem2 = MenuItem(“Item2SubItem2”);
MenuItem menuItem3SubItem3 = MenuItem(“Item2SubItem3”);
MenuItem menu1Item3 = MenuItem(“Item3”);
void setup()
{
pinMode(buttonPinLeft, INPUT);
pinMode(buttonPinRight, INPUT);
pinMode(buttonPinEnter, INPUT);
pinMode(buttonPinEsc, INPUT);
lcd.begin(16, 2);
//configure menu
menu.getRoot().add(menu1Item1);
menu1Item1.addRight(menu1Item2).addRight(menu1Item3);
menu1Item1.add(menuItem1SubItem1).addRight(menuItem1SubItem2);
menu1Item2.add(menuItem2SubItem1).addRight(menuItem2SubItem2).addRight(menuItem3SubItem3);
menu.toRoot();
lcd.setCursor(0,0);
lcd.print(“www.coagula.org”);
} // setup()…
void loop()
{
readButtons(); //I splitted button reading and navigation in two procedures because
navigateMenus(); //in some situations I want to use the button for other purpose (eg. to change some settings)
} //loop()…
void menuChanged(MenuChangeEvent changed){
MenuItem newMenuItem=changed.to; //get the destination menu
lcd.setCursor(0,1); //set the start position for lcd printing to the second row
if(newMenuItem.getName()==menu.getRoot()){
lcd.print(“Main Menu “);
}else if(newMenuItem.getName()==”Item1”){
lcd.print(“Item1 “);
}else if(newMenuItem.getName()==”Item1SubItem1”){
lcd.print(“Item1SubItem1″);
}else if(newMenuItem.getName()==”Item1SubItem2”){
lcd.print(“Item1SubItem2 “);
}else if(newMenuItem.getName()==”Item2”){
lcd.print(“Item2 “);
}else if(newMenuItem.getName()==”Item2SubItem1”){
lcd.print(“Item2SubItem1 “);
}else if(newMenuItem.getName()==”Item2SubItem2”){
lcd.print(“Item2SubItem2 “);
}else if(newMenuItem.getName()==”Item2SubItem3”){
lcd.print(“Item2SubItem3 “);
}else if(newMenuItem.getName()==”Item3”){
lcd.print(“Item3 “);
}
}
void menuUsed(MenuUseEvent used){
lcd.setCursor(0,0);
lcd.print(“You used “);
lcd.setCursor(0,1);
lcd.print(used.item.getName());
delay(3000); //delay to allow message reading
lcd.setCursor(0,0);
lcd.print(“www.coagula.org”);
menu.toRoot(); //back to Main
}
void readButtons(){ //read buttons status
int reading;
int buttonEnterState=LOW; // the current reading from the Enter input pin
int buttonEscState=LOW; // the current reading from the input pin
int buttonLeftState=LOW; // the current reading from the input pin
int buttonRightState=LOW; // the current reading from the input pin
//Enter button
// read the state of the switch into a local variable:
reading = digitalRead(buttonPinEnter);
// check to see if you just pressed the enter button
// (i.e. the input went from LOW to HIGH), and you’ve waited
// long enough since the last press to ignore any noise:
// If the switch changed, due to noise or pressing:
if (reading != lastButtonEnterState) {
// reset the debouncing timer
lastEnterDebounceTime = millis();
}
if ((millis() – lastEnterDebounceTime) > debounceDelay) {
// whatever the reading is at, it’s been there for longer
// than the debounce delay, so take it as the actual current state:
buttonEnterState=reading;
lastEnterDebounceTime=millis();
}
// save the reading. Next time through the loop,
// it’ll be the lastButtonState:
lastButtonEnterState = reading;
//Esc button
// read the state of the switch into a local variable:
reading = digitalRead(buttonPinEsc);
// check to see if you just pressed the Down button
// (i.e. the input went from LOW to HIGH), and you’ve waited
// long enough since the last press to ignore any noise:
// If the switch changed, due to noise or pressing:
if (reading != lastButtonEscState) {
// reset the debouncing timer
lastEscDebounceTime = millis();
}
if ((millis() – lastEscDebounceTime) > debounceDelay) {
// whatever the reading is at, it’s been there for longer
// than the debounce delay, so take it as the actual current state:
buttonEscState = reading;
lastEscDebounceTime=millis();
}
// save the reading. Next time through the loop,
// it’ll be the lastButtonState:
lastButtonEscState = reading;
//Down button
// read the state of the switch into a local variable:
reading = digitalRead(buttonPinRight);
// check to see if you just pressed the Down button
// (i.e. the input went from LOW to HIGH), and you’ve waited
// long enough since the last press to ignore any noise:
// If the switch changed, due to noise or pressing:
if (reading != lastButtonRightState) {
// reset the debouncing timer
lastRightDebounceTime = millis();
}
if ((millis() – lastRightDebounceTime) > debounceDelay) {
// whatever the reading is at, it’s been there for longer
// than the debounce delay, so take it as the actual current state:
buttonRightState = reading;
lastRightDebounceTime =millis();
}
// save the reading. Next time through the loop,
// it’ll be the lastButtonState:
lastButtonRightState = reading;
//Up button
// read the state of the switch into a local variable:
reading = digitalRead(buttonPinLeft);
// check to see if you just pressed the Down button
// (i.e. the input went from LOW to HIGH), and you’ve waited
// long enough since the last press to ignore any noise:
// If the switch changed, due to noise or pressing:
if (reading != lastButtonLeftState) {
// reset the debouncing timer
lastLeftDebounceTime = millis();
}
if ((millis() – lastLeftDebounceTime) > debounceDelay) {
// whatever the reading is at, it’s been there for longer
// than the debounce delay, so take it as the actual current state:
buttonLeftState = reading;
lastLeftDebounceTime=millis();;
}
// save the reading. Next time through the loop,
// it’ll be the lastButtonState:
lastButtonLeftState = reading;
//records which button has been pressed
if (buttonEnterState==HIGH){
lastButtonPushed=buttonPinEnter;
}else if(buttonEscState==HIGH){
lastButtonPushed=buttonPinEsc;
}else if(buttonRightState==HIGH){
lastButtonPushed=buttonPinRight;
}else if(buttonLeftState==HIGH){
lastButtonPushed=buttonPinLeft;
}else{
lastButtonPushed=0;
}
}
void navigateMenus() {
MenuItem currentMenu=menu.getCurrent();
switch (lastButtonPushed){
case buttonPinEnter:
if(!(currentMenu.moveDown())){ //if the current menu has a child and has been pressed enter then menu navigate to item below
menu.use();
}else{ //otherwise, if menu has no child and has been pressed enter the current menu is used
menu.moveDown();
}
break;
case buttonPinEsc:
menu.toRoot(); //back to main
break;
case buttonPinRight:
menu.moveRight();
break;
case buttonPinLeft:
menu.moveLeft();
break;
}
lastButtonPushed=0; //reset the lastButtonPushed variable
}

Tutorial: come gestire menu e display LCD con Arduino by Giuseppe Di Cillo – Coagula.org is licensed under a Creative Commons Attribuzione – Non commerciale – Condividi allo stesso modo 3.0 Unported License.